


How to Configure Remote Desktop to Transfer Files
Transferring small files to your new Windows Server can be a hassle when first setting everything up. Plesk, file transfer protocol (FTP), or network file sharing might not be ready to use, or your Internet service provider (ISP) may block those web ports.
One solution is using the Remote Desktop Connection program to transfer files. This five-step tutorial will teach you how to install and configure Remote Desktop on your Windows PC and use it for your file transfers.
What is Remote Desktop Protocol?
Remote Desktop Protocol (RDP) is Microsoft’s proprietary protocol that provides a graphical interface for connecting to other servers or computers over a network connection. In addition, it gives the ability to redirect one server or workstation's hard drive, making it appear once logged into another server or workstation.
The Remote Desktop Connection program comes with all Windows operating systems. It uses the remote desktop protocol to transfer files.
Opening Remote Desktop Connection
To access Remote Desktop Connection, click the Start button and search for Remote Desktop Connection. Along with the name, you see an icon of a computer monitor with green arrows.

Configuring Remote Desktop
Follow these steps to configure the application to redirect your local workstation’s C: drive.
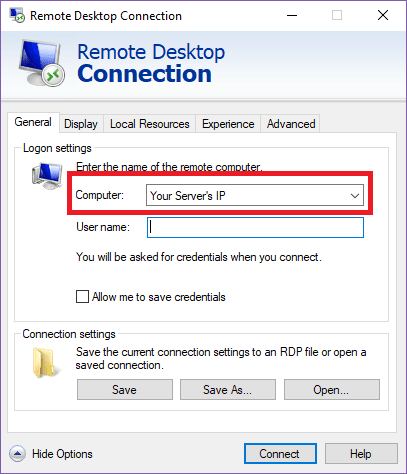
Step 1:
Click Show Options to open the tabbed view.
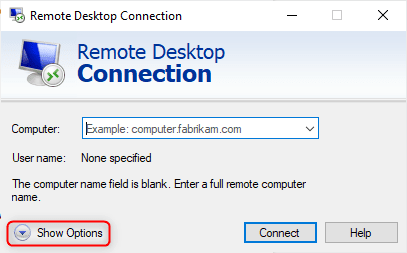
Input your server’s IP address in the Computer field.
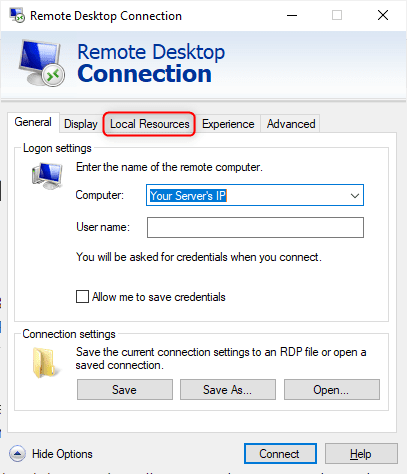
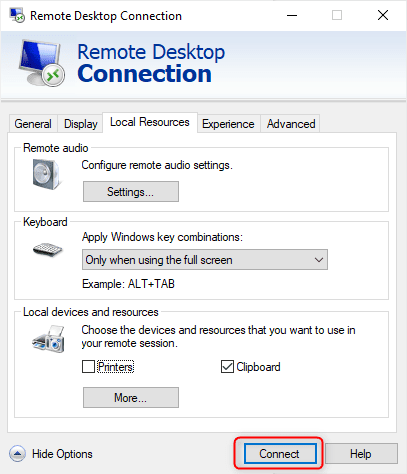
Step 2:
Select the Local Resources tab.
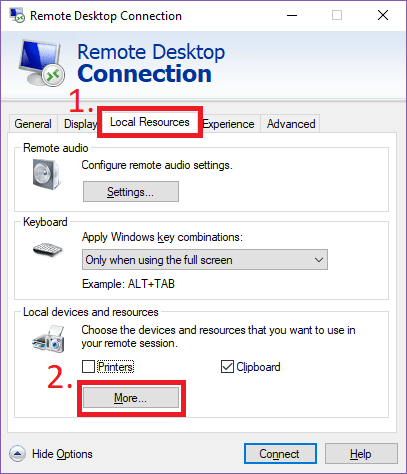
Step 3:
Select the More button under Local devices and resources.
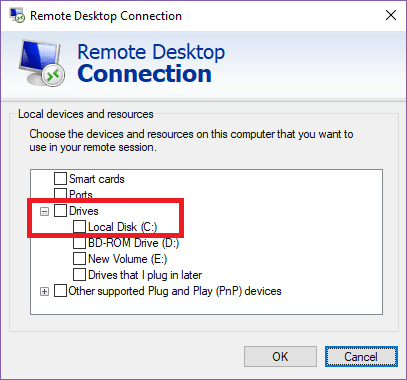
Step 4:
Expand the Drives section and click the checkbox next to Local Disk (C:) or all drive arrays that apply to your setup.
Click OK to return to the tabbed view.
Step 5:
Click Connect.
Accessing Your Files
Once connected to the server, follow the steps below to access the files.
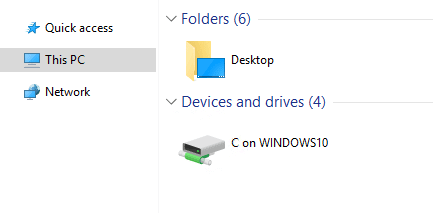
1. Log into the server whose IP address is in RDP.
2. Open File Explorer.

3. Select This PC or Computer on the left.
4. Double-click C on WINDOWS10.
Wrapping Up
You can now see all the files on your local workstation and use a remote desktop to transfer files. However, there is a file size limitation of 2 GB when you move files over RDP. Additionally, transfer speeds may be a little slower.
Use the Plesk control panel to set up FTP for transferring large files. It also has a built-in file manager. For additional details, view the Plesk add-ons and the Plesk customer guide.
Set up your Windows dedicated server with Liquid Web to set up Remote Desktop Connections to transfer files today.
Related Articles:


About the Author: Ronald Caldwell
Ron is a Technical Writer with Liquid Web working with the Marketing team. He has 8+ years of experience in Technology. He obtained an Associate of Science in Computer Science from Prairie State College in 2015. He is happily married to his high school sweetheart and lives in Michigan with her and their children.


Our Sales and Support teams are available 24 hours by phone or e-mail to assist.
Latest Articles
How to Configure Remote Desktop to Transfer Files
Read ArticleWhat is VMware Fusion?
Read ArticleFive Steps to Create a Robots.txt File for Your Website
Read ArticlePremium Business Email Pricing FAQ
Read ArticleMicrosoft Exchange Server Security Update
Read Article